Saturday, October 29, 2011

Domino Collage

 Maggi saw a great post showing a domino collage here. We decided to make our own version. Here is Mary, Bev, Maggie, Margaret and Chrissy working on their dominoes.
First color dominoes with alcohol inks.
 Stamp images with StazOn ink. I also stamped bird image on tissue, adhered with matte medium and colored with alcohol ink.  Glued onto mesh.
 Add embellishments. Lower right corner has flashing foil/ventilation tape as was done with the fragments project.
 Used 26 gauge copper wire to add beads and charms to the outside edges. What a fun project.
Here are the others' work in progress.


Friday, October 28, 2011

Book Study - Ventilation Tape

On NGS group, we're doing a study of Darlene Olivia McElroy & Sandra Duran Wilson's book "Surface Treatment workshop" This week we're looking at the section Ventilation Tape, previously known to me as foil flashing tape. It is a product similar to aluminum foil, but has adhesive on the back side which is covered by paper. This can be found in the hardware store. This can be used much the same as aluminum foil, but is narrower.
 There are some fun suggestions of using this product in the book. Create texture in the ventilation tape (this can be done with an embossing folder, as I did, or over a texture plate or stencil, or drawn on with a pencil).
 Cut the tape into desired shapes, pull off the paper backing and adhere to your surface (I painted watercolor paper with gold acrylic paint and stamped on circles with black acrylic paint). Press down the edges of the ventilation tape.
 If desired, use a paintbrush to add a layer of acrylic paint over the ventilation tape, let dry for about 15 minutes.
 Use a paper towel to wipe the paint off the raised areas, leaving the paint in the crevices. More paint can be added as desired.
 Here's the background I created.
 Another way to use the tape mentioned by the authors is to use the tape as a functional element by taping down collage pieces. Here I added brown acrylic paint and wiped off the top of the textured ventilation tape, then cut the tape into small pieces and used it to adhere an image printed on a transparency sheet to the atc.

Fragment Charms

 This morning at Creative ART Camp 2011, we made charms out of Tim Holtz's fragments. You can see the basic technique from Tim here. I made mini collages under the fragments. For the backs, we colored foil flashing tape and adhesive backed foil sheets with alcohol inks, ran them through embossing folders and used sand paper to rub the ink off the raised surfaces.
The foil flashing tape has an adhesive on the back. Removed the backing, laid the fragments on top, cut to size and used sand paper to even out the edges. Don't these backs look stunning?
 On the front of the charms I've added rhinestones, raised sticker letters, and metal bits. Next is to add jump rings with beads and/or small coordinating charms. Fun project!!!

Valise Book

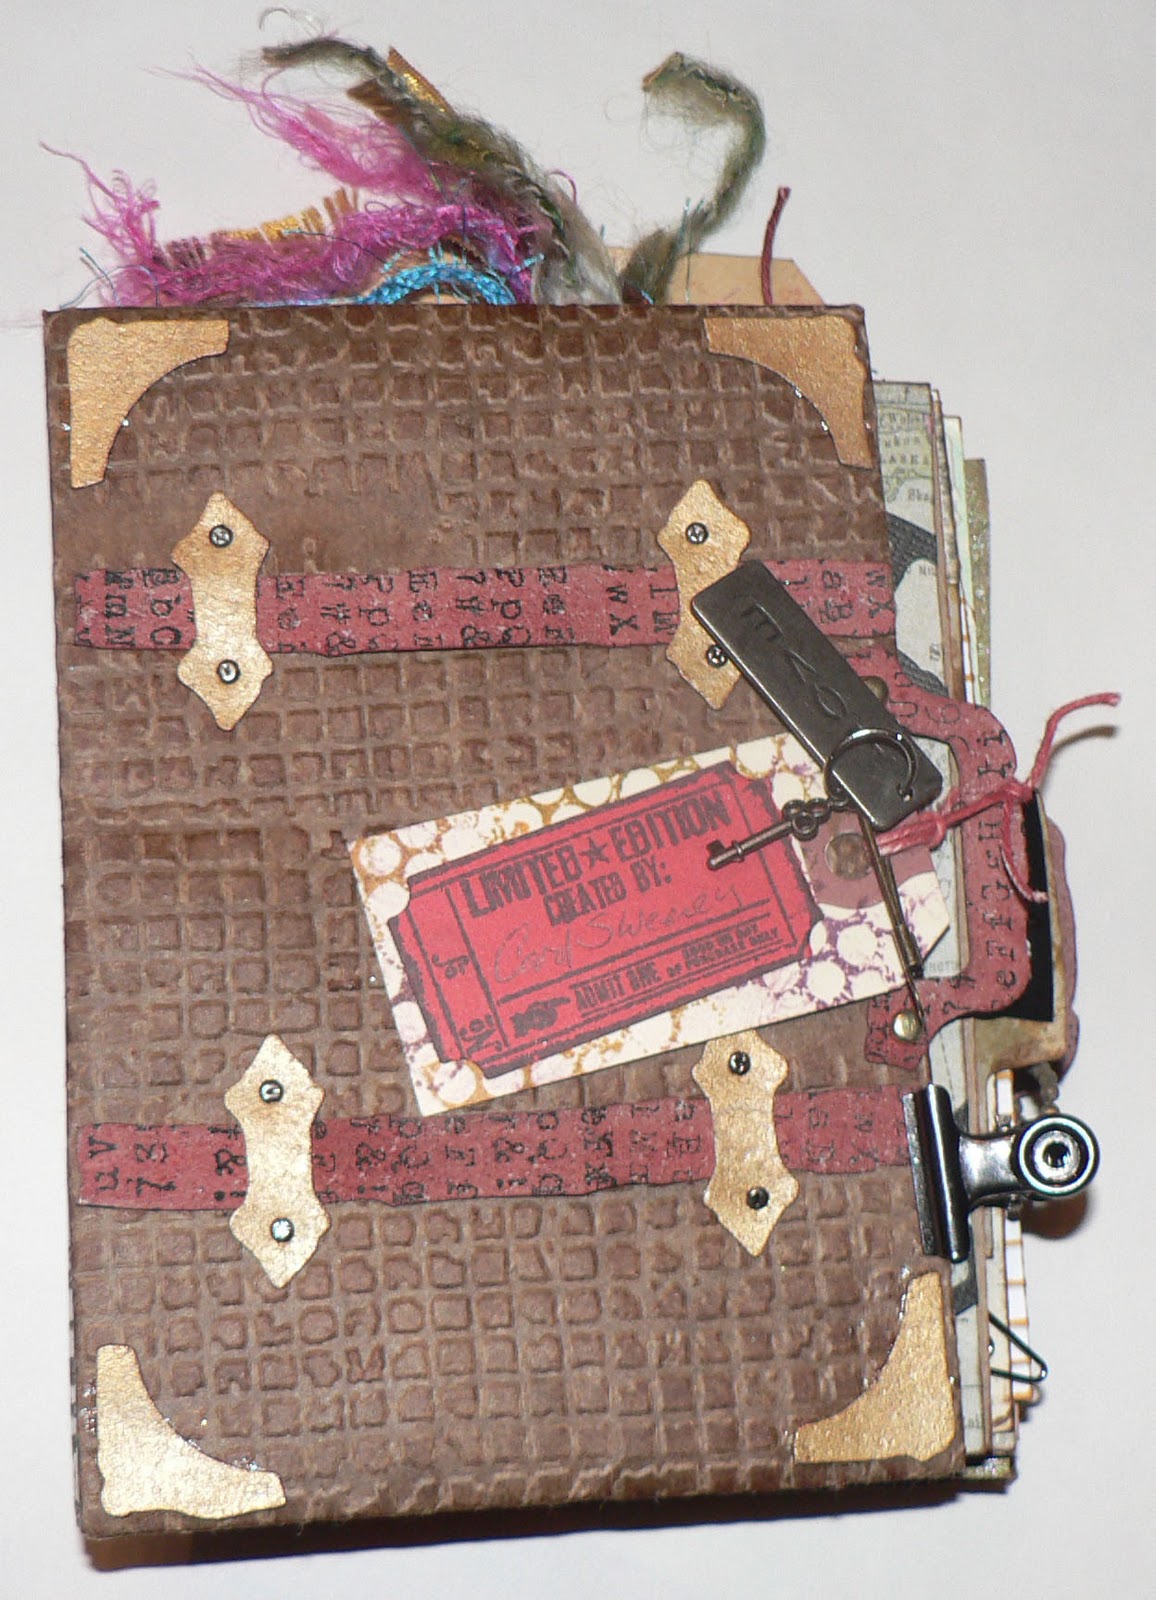
On Wednesday we took a fun class from Jan at Red Rubber Paper and Ink in Wisconsin. We made these Valise Books and learned lots of techniques in the process. We finished the last three pages today.


Christmas Card for Stamp Club

I missed stamp club last night but sent in my cards. The theme was Christmas. I used the Tim Holtz On the Edge Snowflake die to cut off part of the card front and layered it over decorative paper and stamped on Nativity images and the word "Believe". Used Rock Candy Distress Stickles to highlight the snowflakes and the halo above baby Jesus.

Thursday, October 27, 2011

More Fabric Beads

 This afternoon was my turn to teach at the Creative ART Camp in Wisconsin. I taught fabric beads. You can see the instructions here. Everyone seemed to have fun with this project:
I did some fabric painting and some stamping on batik fabrics.
 When I removed some of the plastic wrap from this mornings' project, there was still enough glimmer mist to color some muslin. I did some fabric painting on them also and turned them into beads.
 These are the stamped batik fabric beads. Some I tied on fibers. Others I added some Diamond Glaze and rolled in micro beads.
 The first set of fabric painted beads. All have tied on fibers, some also have beads added.
 These are from the muslin colored with Glimmer Mists. Some I added copper wire and beads. The others were covered with Diamond Glaze then rolled in clear glitter with a few red micro beads.
Fun collection of beads!

Glimmer Mist and Plastic Wrap backgrounds

   I'm at the Creative ART Camp 2011 in Wisconsin (Chrissy's house), with Kathy, Mary, Chrissy, Bev and Margaret. Maggi is ill and couldn't come today : (

Today Margaret got us messy creating background papers and covers for a journal. This is similar to the Watercolor Plastic Wrap Technique.  Generously spray Glimmer Mists (or any dye ink based sprays with mica powders) over watercolor paper. Mix colors as desired. The colors should pool. Cover with plastic wrap and wrinkle/crease it up. Put it aside to dry, before removing the plastic wrap. Then do the reverse side.


Here is one of my papers waiting to dry.
 Here are some of the pages waiting to dry from several of the attendees.
 Here's one of the finished backgrounds. It's hard to see the glimmer in the photo. But these are so cool!

Tuesday, October 25, 2011

Mini Bottle Charms

I wanted to make some fun charms/embellishments to give to the others at our mini Art Retreat in Wisconsin. I had fun making similar ones last year.

 Stamped a face image on a small piece of film strip ribbon with dark blue StazOn ink.
Made small butterfly embellishments out of left over Fantasy Film,. Placed two pieces of fantasy film on a rubber stamp inked with Azure StazOn ink, with parchment paper on top and heated with a dry, hot iron. Then cut out the image.
 Colored some Shake on beads with purple alcohol ink, let dry.
Glued a small piece of Foxy-Oxi paper on the back of the stamped film ribbon strip. Back side of Foxy-Oxi paper showing through film ribbon strip (white side) colored side on back side. Placed this inside the mini bottle charm. Added in some purple shake on beads and the butterfly fantasy film. Here's the front and back.
Added some fibers and beads to the top of the cork.