Friday, March 30, 2012

"M" Technique ATC

We are now half way through the alphabet in our ABC's of Technique ATC Swaps on ArtVentures. Cut up the multi-layered metallic marker backgrounds I made earlier into ATC sized cards. Stamped stars with midnight blue StazOn ink.
 Added a piece of music tissue tape and lightly painted on some gold Perfect Pearls with a damp brush.
 Adhered the melting pot moon embellishment and added to mini star brads.

Thursday, March 29, 2012

Stencil as a Stamp

After applying lots of silver Brilliance Ink through a stencil in another project: 
 I decided to flip the stencil over and press down onto a couple of the soap backgrounds I'd made earlier to add more depth to them.
 This one was originally down on watercolor paper and is textured and I had applied beads in a make your own specialty gel technique. This meant the stencil was only applied to part of the card, and only picked up the silver ink on the raised areas of the watercolor paper. Fun!
 There was still silver Brilliance ink on the stencil so I pressed it down on this background and like how it adds some depth to the background.

Sudoku Two - Step 2 on Pea's background

I received these gorgeous backgrounds from Pea. We are in another Sudoku ATC swap (a progressive ATC swap). This time there are 8 players. It will be interesting!
 I decided to apply Starlit Silver Brilliance Ink through a stencil to enhance the background.
 I like how these turned out. Will be fun to see what the next 6 players add.

Melting Pot Moon Embellishment

Finally bought a melting pot, a wanted to see if these metallic moon embellishments would be easier in the melting pot, than doing in three layers over embossing ink and melting with a heat tool as seen in this post.
Stamped moon image on mat board and cut out. Added a masking tape flap to have something to hold with the tweezers to pick up in the melting pot.
 Heated gold embossing enamel in Melting Pot per melting pot instructions. Dropped mat board into the melted embossing enamel to coat top surface.
 Had moon stamp inked with midnight blue StazOn ink, removed mat board and pressed inked stamp into the still melted embossing enamel on the mat board.
 I think the time it took to move the mat board from the melting pot to the craft sheet, the embossing enamel had started to cool somewhat. So the stamped impression isn't as deep as when I did this technique with a heat tool.

Wednesday, March 28, 2012

M is for Mulberry Magic

This is a great technique to add some interesting texture to backgrounds, from the Technique Junkie Newsletter.
Sponge on inks to card stock as desired.
 Add a stamped image with dark ink and let dry completely.
 The article says to use Modge Podge for the next two steps, but I found Matte Gel worked just as well. Coat the entire surface with a thick layer of the matte gel.
 Cover with a piece of mulberry paper a little larger than your card and sponge on another layer or matte gel. Gently press the mulberry paper down into the card. Be careful not to tear the mulberry paper.
 When the gel dries, trim the edges of the mulberry paper. I like how this looks.
 I colored the edges with midnight blue StazOn ink and added some images on acetate.

Tuesday, March 27, 2012

M is for Mesh Direct

This versatile technique from the Technique Junkie Newsletter is different from the Brayered Mesh technique.
Tape piece of plastic mesh (from a produce bag) to a craft sheet or scrap paper on three sides, keeping mesh taut. Slip card stock under the mesh and tape fourth side.
 Use sponge brayer to ink card stock through the mesh. I found my paper wanted to move, so needed to hold down one corner while using the brayer. Use rainbow pad or several colors from different ink pads.
 Remove card stock from under the mesh. Look for different sizes of mesh and experiment with different color combinations.

Monday, March 26, 2012

M is for Marker Wash

Fun technique from the Technique Junkies Newsletter
Stamp an image on water color paper and cover with black embossing powder and heat set. It's recommended to use images with open areas.
 Use water based markers to color in the open areas in the stamped image. Use colors that won't muddy when mixed together.
 Spray water into the colored areas.
 Tilt the card to move the colored water over the surface.
 Let air dry for a washed look, or use a heat tool to dry and get a puddled appearance (this was air dried):
Stamped flourishes with purple dye ink. Colored edges with black soot Distress ink and also to stamp the word "soar". Added small purple rhinestone to bird's eye.

Friday, March 23, 2012

Book Study - Rubbing Alcohol

On NGS group, we're doing a study of Darlene Olivia McElroy & Sandra Duran Wilson's book "Surface Treatment workshop " This week we're looking at the section "Rubbing Alcohol". This is the same technique as the alcohol dissolve on acrylic technique.I was able to do this technique a few years ago, but had trouble this time. Even though I used 70% rubbing alcohol last time, I got no results this time. So I purchased 91% rubbing alcohol (the strongest concentration I could find). 
I re read the book, the authors state that the effect of this technique is more dramatic on a slick surface than on a porous one. Now I see, last time I did the technique on a gesso primed canvas. This time I used watercolor paper. That explains it. (I'm better at looking at pictures than reading all the instructions)
If desired, paint surface first with acrylic paint and let dry (I used marigold acrylic paint). Use a thin coat of diluted paint or liquid acrylic over the surface:
 Then drop rubbing alcohol on to the surface. You can use a dropper or a toothbrush or a q-tip or in a spray bottle (I'm not sure of the safety of vaporizing the alcohol, so I didn't try that). On the sample on the left, in the time I quickly took the photo above and then dropped on the alcohol, the paint was not wet enough to show well. The sample on the right was done the same, but I didn't stop to take a photo. You can see how the paint begins to form pools and reveal the paint underneath.
 When dry:
 Tried doing another layer. Painted a mixture of watered down q. nickel azo gold and brown acrylic paint, then dropped on the rubbing alcohol.
 Here's my result.
 Also, tried this technique with Lumiere (a metallic acrylic paint) over a red painted watercolor paper. When I dropped on the rubbing alcohol, it seem to just lift off the Lumiere paint, not to create the pooling of paint as the above samples.
 The authors say that a really wet paint will give slightly wavy circles and a drier paint will give sharper edges. I'm thinking I used too thick of a layer of paint here.
To see better results of this technique where I flicked on rubbing alcohol with my finger and with a toothbrush check out this post.

Thursday, March 22, 2012

M is for Metallic Alcohol Roll

I'm having fun trying lots of "M" techniques from the Technique Junkies Newsletter.
Pour some alcohol blending solution on a non stick craft sheet. Drop on 2-3 colors of coordinating alcohol inks, try to keep separate. Add a few drops of metallic mixative (discovered my copper no longer works, so added some gold metallic fixative).
 On Roll sponge brayer through the inks to pick up colors (you sponge will be permanently colored, but once dry shouldn't transfer these colors to future projects).
Roll brayer over card stock. Continue to pick up colors with the sponge brayer and roll over the paper until covered to how you like. Leaving white space is OK.
The gold metallic fixative didn't show well.
Not part of this technique, but decided to make some gold spots on the craft sheet with a metallic marker.
Used sponge roller to pick up the gold ink and rolled it over the surface:

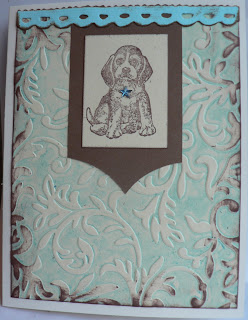
Pet Card

This month at stamp club, we're to make pet related cards. I decided to use the technique of adding color by embossing the ink into the paper with an embossing folder. In the side of the embossing folder you want to be the debased image.
 Then run card stock through the embossing folder. I used a cream flecked paper.
 Colored the edges with brown ink. Stamped a dog image on the same card stock, cut out & layered on brown card stock, and added a blue star rhinestone. Cut out a strip of blue card stock and colored the edges with brown ink. Layered all on a cream card.

Wednesday, March 21, 2012

M is for Metallic Glow

Another technique from the Technique Junkies Newsletter.
Stamp an open image with permanent black ink on glossy card stock.
 Color image with metallic pencils, completely color image.
 Stipple dye ink colors over the entire card.
 Use paper towel to wipe ink off of metallic penciled areas.
 How it looks: