Tuesday, July 31, 2012

Compendium of Curiosities 2 - Challenge 15 Enameled Metals

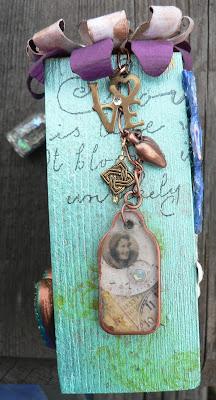
I'm participating in the 15th Challenge from Tim Holtz's book "Compendium of Curiosities 2"  on Linda's blog. This time the technique is the Enameled Metals on pg. 56 of tTim's book. Following the directions in the book, I created this ATC background using eggplant Acrylic Paint Dabber and vintage photo Distress Ink.
 I also did the enameled metal technique on the pen nib with stream Acrylic Paint Dabber and the vintage photo Distress Ink. Also added some stream Acrylic Paint Dabber to the edges of a Grunge Paper Flower I made earlier.
 Added the enameled pen nib and grunge paper flower to the enameled metal background, also colored in the text of a philosophy tag with the stream Acrylic Paint dabber.
Fun!

Sudoku Round 3 - Step 6 on Maggi's Background

Maggi made the background, Mary added the grunge corner, Chrissy added the stamped flowers, Margaret added the floral centers, and Bev added the cat.
 I added a black outline and centers to the small flowers on the grungy corner. Two more steps to go...

Sudoku Round 3 - Step 5 on Mary's Background

Mary made the background, Chrissy added the red kimono, Margaret added the vase, and Bev added the buttons.
 I used picket fence Distress Stain to add white to the inner edges of the vase.

Quilt

Made this quilt for a friend, hope it cheers her up!

Friday, July 27, 2012

Sudoku Round 3 - Step 4 on Chrissy's Background

Chrissy made the background, Margaret stamped the flower, and Bev colored in the stamen gold.
 Stamped "joy" with India Ink on a piece of brayered pearl background.
 Placed a clear "pebble" over the stamped background, cut out and layered as the flower center.

Sudoku Round 3 - Step 3 on Margaret's Background

Margaret made these backgrounds and Bev added the button.
 I added the measuring tape ribbon. Excited to see how these turn out.....

Thursday, July 26, 2012

Compendium of Curiosities 2 Challenge - #14 Guilded Kraft Glassine

I came home from a trip just in time to participate in he 14th Challenge from Tim Holtz's book "Compendium of Curiosities 2"  on Linda's blog. This time the technique is the Guilded Kraft Glassine on pg. 39 of the book. This challenge is sponsored by the Funkie Junkie Boutique, who'll award a $25 gift certificate to one lucky winner.
I followed the directions in the book using these colors of alcohol inks, metallic mixative and distress ink.
 Used a butterfly die to cut out wings from the guilded kraft glassine and embossed with a matching Cuttlebug embossing folder. Then added color to the raised areas with spiced marmalade Distress Ink.
 Here's a close up:
 To make the finished atc, I used a Crackle Paste background I made earlier, a vintage image over the guilded kraft glassine wings and three chitchat stickers with the edges colored with black soot Distress Ink.

Friday, July 20, 2012

Chunky ATC Finished

I finished the Chunky ATC I started earlier. One view:
 Another view:
 On the top I placed large flowers. On the left, I place one of the grungy quilled flowers I made a while ago, colored edges of the petals and the backs of the large petals with a Copper Krylon pen, then over a white paper flower. On the right, sprayed a white flower with bronze Perfect Pearl Mist, layered on paper flowers (the middle one was sprayed with bronze Perfect Pearls Mist) and added a bronze piece to the center.
 One of the wide sides, Added an extra charm I made from a swap a while back in the upper left corner. Added a paper clay piece made earlier in a mold, colored the sides with a Copper Krylon Pen, placed in the lower right corner. The word is a "puffy" sticker. Used a Copper Krylon Pen to color its edges.
 One of the narrow sides. Added a vintage image, with a couple of blue rhinestones and some diamond Stickles to the head band. Added two "puffy" stickers, edges colored with a  copper Krylon Pen. The mini bottle charm was made earlier, you can see a better photo and how I made it here.
 The other wide side, Added the wings made earlier. Added a vintage image, used tissue tape over the gown and rubbed on diamond stickles to the gown and the hair of the image. Added some paper flowers, some sprayed with the  bronze Perfect Pearl Mist, blue rhinestone added to one and bronze brads added to the others.
 The other narrow side, Made a charm pendant with one of the fragment charms I made last fall, and colored the sides with the copper Krylon Pen, added some smaller charms to the chain.
 The bottom, wrapped the end of the vintage figure's gown. Added stickers to create a title, colored the edges and stickers with walnut stain Distress Ink, and signed my name.
I had lots of fun making this, hope the recipient enjoys it.

Thursday, July 19, 2012

Fantasy Film and Chipboard

I need some wing embellishments for a swap I'm working on. Painted the chipboard with pearl white Lumiere paint and let dry.
Place a piece of Fantasy Film over the chipboard, then a piece of parchment paper and heat with a dry iron for 3 - 5 seconds.
Used heat tool to get the fantasy film to melt around the edges.
Added a second larger sheet of fantasy film over the chipboard, ironed then folded the excess to the back and heated with heat tool. If you didn't want the fantasy film to melt and have holes, don't use the heat tool (or be very careful if you do use it).
Looking good, but I'm thinking one more layer of fantasy film.
I think these look like great wings.

Wednesday, July 18, 2012

"E" Doodled ATC

I liked the bright intense colors in the ATC using the Spritz and Flick technique last week. I think it would make a great background for one of the Unleashed Doodling A - Z ATC swap I'm in over in the ArtVentures Group.
used an  applicator to rub on these colors of Distress inks, love how they blend so well.
SSplattered water drops onto the ink, then heat set.
Used these pens to sketch out the letter "E"
Added more doodling: flowers, mini leaves, another line to the "E" and a dot border.

Tuesday, July 17, 2012

Chunky ATC - getting started

I signed up for a Chunky ATC swap on the Kindred Souls Art Group. I hadn't seen one and was surprised at how "chunky" they are. 3-1/2" x 2-1/2" x "2". All six sides have to be decorated. 
First I sanded the edges.
 Coated all sides with light coat of gesso and let dry.
 Painted all sides with Pearl Turquoise Lumiere paint, and let dry.
 Stamped a saying on the long sides with India Ink. Stamped flourishes on all six sides with green acrylic paint (wash acrylic paint off your stamps right away). Let dry.
 Used gold Lumiere paint, in some places sponged over sequin wastes, in others applied dots with a pencil erasers. Let dry.
 Used a green oil pastel to add color behind the flourishes, rubbed it in with my finger. Sprayed all 6 sides with heirloom gold Perfect Pearls Mist.
I Now to think about how to embellish all the sides......

Q is for Quilted Metal

Q is for Quilted Metal. This technique gives the look of a quilt made out of metal. I made a piece with this technique for a deco page swap.
Start by placing pieces of foil flashing tape in various embossing folders and emboss.
Color each piece of the embossed foil tape with different colors of alcohol ink. Sand raised areas with sand paper.
 Place the different pieces of colored embossed foil on card. Use a sewing tool or other piercing tool to make "stitch" lines around each piece.
 I placed a decorate "Q" in the center. I'll use this as a divider in my ABCs of Technique ATC album.

Saturday, July 14, 2012

Compendium of Curiosities 2 Challenge - #13 Spritz and Flick Distress

The 13th Challenge from Tim Holtz's book "Compendium of Curiosities 2" is up on Linda's blog. This time the technique is Spritz and Flick Distress on pg. 42 of the book. I love this technique! And it is the second Friday of the month, and Simon Says Stamp will be giving an awesome $25 gift certificate to one lucky, randomly-selected participant in this week's challenge!
I'm making an ATC, so I did the spritz and flick distress technique with these colors on a piece of manila folder cut to 2-12"x3-1/2". The instructions for this technique is on page 42 of Tim's book. Love how the Distress inks blend so well and keep the colors vibrant!
 Stamped a tree image with white acrylic paint and let dry (remember to wash acrylic paint off of your stamps immediately).
 Used a variety of coordinating Distress inks to repeatedly stamp a butterfly image instead of leaves all over and around the tree.
 Stamped a saying with black India ink, also another small butterfly image near the bottom and colored the edges of the atc. Attached a small butterfly sticker.